Tag: macOS

  • Removing an old phone number from Messages on Mac

    I’ve been having this persistent problem of an old contact number showing up when sending a text message using Messages on the Mac. The problematic old phone number never showed up when sending messages on the iPhone or iOS devices. I tried deleting the cache files on the mac to no avail. (I don’t recommend doing it, as it caused issues with syncing messages.) The old contact kept coming back. It turns out that there can be such things as orphaned contacts. This is what fixed it for me:

    1. Open the Messages app and type the old name in the search bar.
    2. Select the contact that appears to start a new conversation.
    3. Click the drop arrow next to the “To:” field at the top and choose “Add to Contacts.”
    4. Delete the conversation.
    5. Open the Contacts app and search for the old name or number.
    6. Delete the empty contact.

    Voila, that phone number from 10 years ago is finally gone!

  • Fix your macOS Big Sur mail.app

    Why is macOS Big Sur mail.app so awful? Why can’t I find that message I know is there using search?

    One of the things I’ve always loved about macOS has been the spotlight search functionality. A quick command-space, a few strokes of the keyboard, hit return, and voila an app launched or a file found. However, in recent times spotlight has seemed to get funky or unresponsive, especially when using search within mail.app.

    The most annoying spotlight failures are in mail.app. I use mail.app as my main email client to pull my various gmail accounts together in one inbox. So, today I am looking for an email, I type from:person name fwd sell and it comes up with ZERO results. I try various incarnations and cannot find a stupid email from less than 2 months ago. I mention this to my wife and she tells me she just searches in gmail on the web. We use mail.app with google gmail. I’ve never used it with iCloud, maybe it’s better, same walled garden ecosystem and all y’know.

    But, it SHOULD work! I give up, I type the exact same search criteria in gmail on the web and it comes up as the first result. I used to have a lot of faith in the quality of Apple software releases, but the last few release of macOS and iOS have had some annoying bugs. I still prefer the UI to desktop Linux or Windows, but…

    Ok so you want solutions not complaining, so here are a few tips to maintain your mail.app and keep it minty fresh:

    • Practice good email hygiene.
      • Delete those old emails, empty those spam folders, and remove old attachments to reduce your total mailbox size.
    • Rebuild your mailboxes
      • Rebuilding your mailboxes re-downloads your email from what is stored on the mail servers.
      • Launch mail.app, select your mailbox on the left pane list and then select Mailbox > Rebuild
    • Reindex your mailboxes
      • Reindexing your mailboxes
      • Make sure mail.app is closed
      • In the Finder, press Command-Shift-L to open the Library folder and then navigate to Mail > V8 (or whichever version you are using) > MailData, then delete the following files (NOTE: I suggest backing them up first):
        • Envelope Index
        • Envelope Index-shm
        • Envelope Index-wal
      • Relaunch mail.app, click ‘Continue’, and let it import, reindex, and build new envelope index files. Be patient, it could take awhile, especially if you have 375,000 emails like I do.

    Happy emailing.
  • Tips for upgrading firmware on your Sony Alpha on macOS

    I recently checked for a firmware update for my Sony Alpha a6000 (ICLE-6000) camera. It’s been a great small travel worthy camera for me and despite being on the market so long, Sony still sells it. My camera was still on the v3.20 firmware which was released 7-26-2016, so I wanted to update it to v3.21 which is dated 03-19-2019. The v3.21 firmware improves the stability of the AF (Auto Focus) operation. In brief testing, it appears to me to slightly improve the speed of the autofocus.

    Of course, if you look for the the v3.21 download for macOS, it says that Big Sur is not supported. As luck has it, I’ve recently upgraded to Big Sur, so I went to an old macOS 10.15 laptop to do the upgrade (though I could have used a PC as well). So even with all that and following the Sony instructions, it’s not straightforward. You put your left foot in, you switch the camera on, you put your right foot in, then you shake it all about. A bit of hokey pokey is involved. My firmware update failed to complete several times, but I’m finally on v3.21. Most of the following should apply to any Sony Alpha firmware update on macOS.

    Warning

    Firmware upgrades can be risky, so take proper precautions and do not stop the process midway through. I take no responsibility if your brick your firmware or your camera catches on fire.

    Here are a few of my extra tips to get you there sooner:

    Tips for upgrading Sony Alpha a6000 firmware on macOS

    No Ratings

    Here are a few of my extra tips to get you there sooner:

    Materials

    • Computer with macOS 10.15
    • Mini-USB to USB cable
    • Sony a6000 camera

    Tools

    Instructions

      1. Plug in your computer if it’s a laptop (or desktop :). Under your Mac System Preferences > Power, set your Mac to “Prevent computer from sleeping automatically when the display is off”.
      2. Set your display to not turn off.
        Make sure you have a good micro-USB to USB cable.
        Download the Driver Loader. (If you are on macOS 10.15)
        Download the v3.21 firmware update.
      3. Make sure your camera SD card is removed and the camera is disconnected from your laptop.
      4. Make sure your camera battery is fully charged.
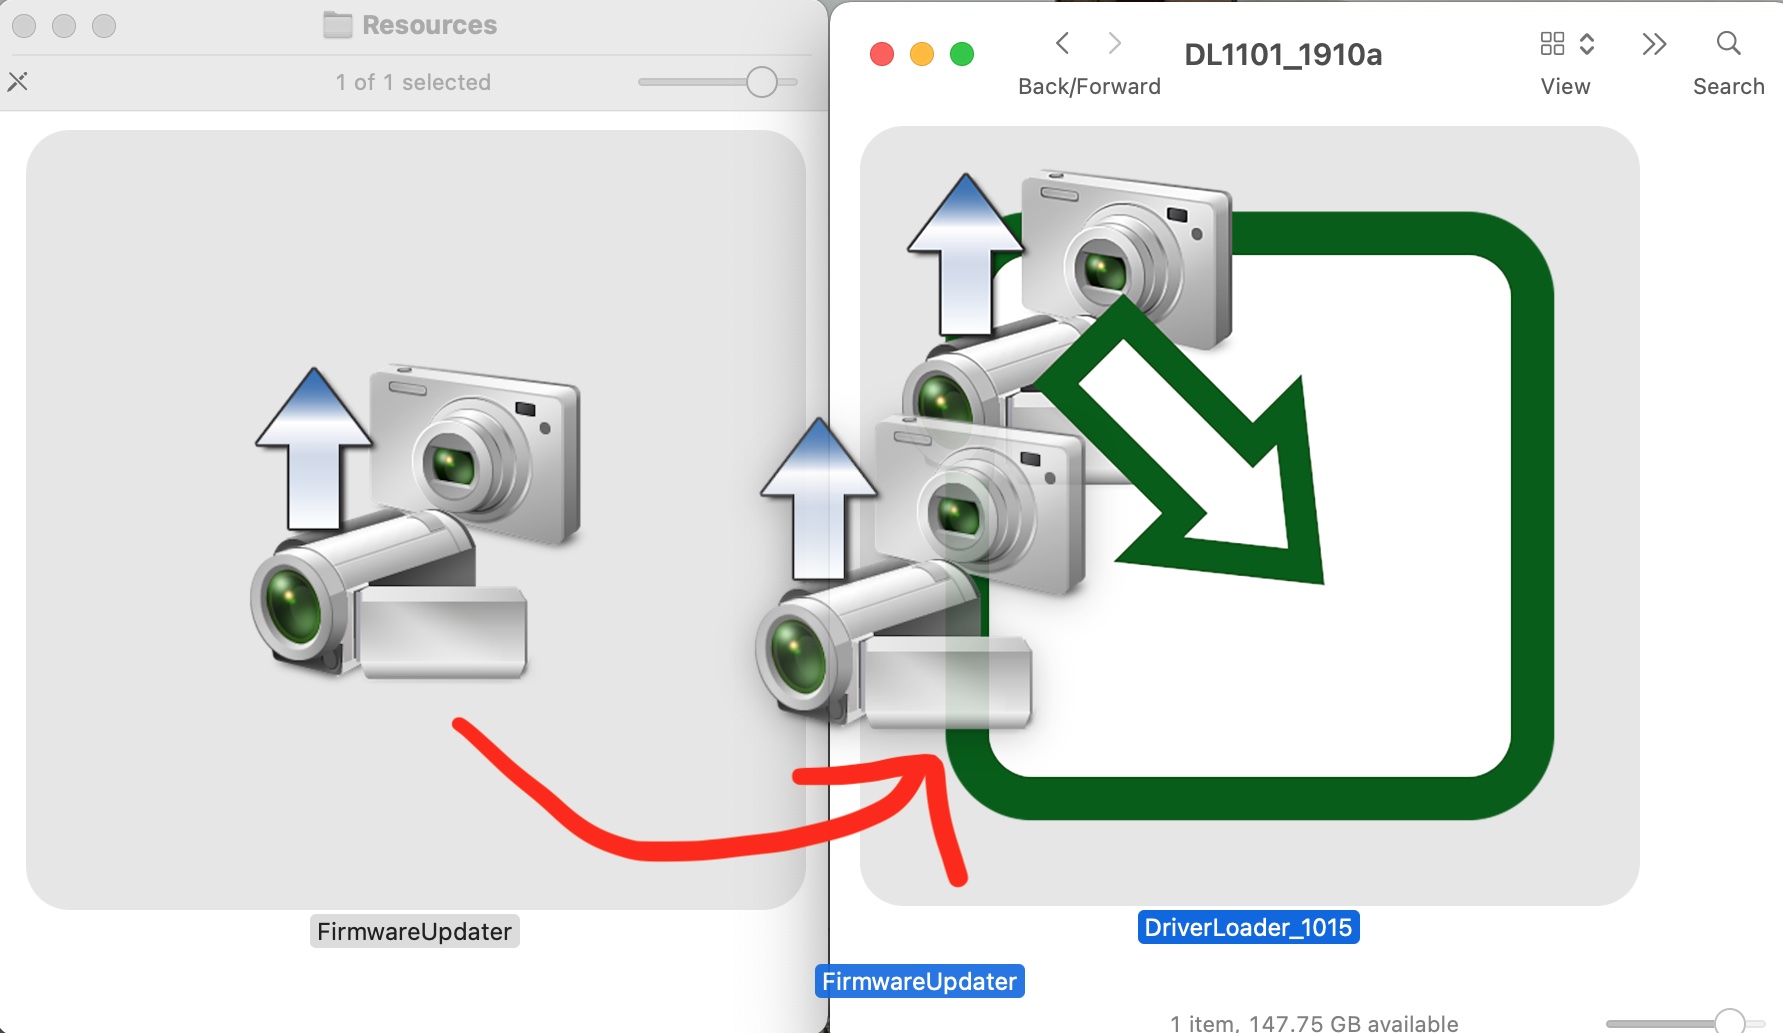
      5. Open the folder you unzipped for the Driver Loader (DL1101_1910a). Here you’ll see the DriverLoader_1015 icon.
      6. Open the firmware folder, then open the ‘Resources’ folder.
        Drag and drop the SystemSoftwareUpdater icon onto the DriverLoader_1015 icon.drag and drop sony v321 firmware for a6000
      7. Click OK to the security prompts (in both English and Japanese), and check System Preferences > Security & Privacy >Allow to allow “Sony Imaging Product & Solutions Inc” and authenticate using your password.
      8. Follow the prompts. First plug in your USB cable with your camera on.
      9. Then it tells you to turn the camera off.
      10. Make sure the camera is in USB Mass Storage mode, then turn it on again and plug it in again.
      11. Click ‘Next’ and start the updater. The firmware update will take a very long time. The red light should be on the underside of the camera. I had multiple failures but it went through on the 4th time after adjusting the computer power settings as stated above.

    Whew, pop your SD card in and enjoy your new camera firmware. Do a funky dance. Happy auto focusing.